Extending Neovim for blogging
Autocomplete with nvim-cmp ★

Contents
Autocompletion is an absurdly powerful feature that I—and I must assume most programmers—use all the time. It’s not as crucial for writing blog posts as when you’re coding but it’s still easy to come up with examples of how autocomplete would help. For example:
-
Complete frontmatter metadata
tags = ["Lua", "Neovim"]series = "extending_neovim_for_my_blog"It’s pretty hard to remember all the tags I have on the blog.
-
Links to posts
You know, typing out
/blog/2024/02/17/how_i_did_the_layout_for_my_self-published_bookcorrectly from memory is pretty much impossible. Instead I opened the post in the browser, copied the url, removed the host prefix, and then pasted it… Which is incredibly slow and annoying. -
Image links
I often copy an image to the site’s image folder and when I want to insert a link to the image I’ve forgotten the file name.
-
Reference link definitions
In Djot (and Markdown) I prefer reference link definitions for my links:
Here's [a link][uses][uses]: /usesIt would be pretty nice to autocomplete the
[uses]reference, like some Markdown LSP servers do. Or maybe the reverse; if I’ve written[a link][uses]already but haven’t created the reference link definition for it, we could autocomplete that.
nvim-cmp is my plugin of choice for autocompletion that supports different sources such as LSP, snippets, spell corrections, math calculations, and more. Let’s see how to make our own source for nvim-cmp.
I’ve probably made some mistakes in this post or forgotten something. Check my Neovim config if you see something fishy.
A basic completion source
Creating a custom source for nvim-cmp was described well in :help cmp-develop.
This is a minimal source that allows you to complete path-like items:
local source = {}
local items = {}
-- There's also the `cursor_after_line`, `cursor_line`, and a `cursor` fields on `context`.
local cursor_before_line = params.context.cursor_before_line
-- Only complete if there's a `/` anywhere before the cursor.
if cursor_before_line:sub(1, 1) == "/" then
items = {
{ label = "/one" },
{ label = "/two" },
}
end
-- `callback` should always be called.
callback(items)
end
-- Trigger completion (i.e. open up cmp) on these characters.
-- We can also trigger it manually, see `:help cmp.mapping.complete`.
return { "/" }
end
-- Don't forget to register your new source to cmp.
require("cmp").register_source("blog", source)
You also need to register the source when you setup cmp:
require("cmp").setup({
  sources = {
    {
      name = "blog",
      -- `group_index` groups several sources,
      -- and if any completion item for that index is found
      -- all sources with a lower index will be ignored.
      group_index = 1,
    },
  }
}
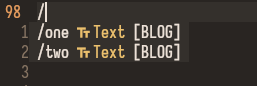
Assuming you’ve got nvim-cmp setup correctly, our completion should show up:
Availability
It might be a good idea to implement the is_available function that only activates autocompletion in certain context:
-- Only returns `true` if the buffer is a markup file inside my blog directory.
return vim.b[0].blog_file
end
vim.b[0].blog_file is set by Buf autocommand from the initial setup:
autocmd({ "BufRead", "BufNewFile" }, {
  pattern = autocmd_pattern,
  group = blog_group,
  callback = function(opts)
    -- Mark the buffer as a "blog file" buffer
    vim.b[0].blog_file = true
    -- ...
  end,
})
Formatting entries
While nvim-cmp doesn’t seem to give as much control over how to display entries as telescope does it’s possible to customize it a little. In particular I’d like to display the entry’s type and mark that it comes from my blog integration (see the image above).
Completion item kinds
Something that pops up in nvim-cmp’s source code and help is an “item kind”.
A “kind” simply describes what type a completion item is.
nvim-cmp follows the LSP specification that includes kinds such as Class, Constant, and the default Text.
Here’s how to specify a kind other than Text for an item:
items = {
  {
    label = "/one",
    kind = require("cmp.types.lsp").CompletionItemKind.File,
  },
}
Kinds aren’t anything revolutionary but I think it helps separate different completion types from each other in certain circumstances.
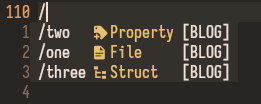
The problem is that LSP kinds are focused on code and doesn’t support the kinds I’d like—such as Post, Draft, and Standalone.
To display our own custom types we need to do a little more work.
Custom format
Instead of relying on lspkind.nvim let’s use our own format function:
cmp.setup({
  formatting = {
    format = function(entry, vim_item)
      -- TODO customize `vim_item` before returning it
      return vim_item
    end
  },
I like lspkind.nvim and I want to use it for everything other than the blog, let’s make it the default:
local
local lspkind_format = require("lspkind").cmp_format({
mode = "symbol_text",
ellipsis_char = "…",
menu = {
spell = "[SPELL]",
async_path = "[PATH]",
-- Other sources here...
},
})
return function(entry, vim_item)
if entry.source.name == "blog" then
return blog_format(entry, vim_item)
else
-- Use `lspkind` formatting as a fallback.
return lspkind_format(entry, vim_item)
end
end
end
-- Remember to update `cmp.setup`:
format = make_format()
For the actual formatting vim_item supports two extra fields that we can customize:
-
kindholds the type information (the 2nd column). -
menuholds the source information (the 3rd column).
blog_format might look like this to add type and source information:
-- The symols are from Nerd Fonts but won't show up
-- in the blog properly.
local blog_types = {
Post = { symbol = "" },
Tag = { symbol = "" },
Series = { symbol = "" },
-- etc
}
local blog_format = function(entry, vim_item)
local type = entry.completion_item.type
vim_item.kind = blog_types[type].symbol .. " " .. type
vim_item.menu = "[BLOG]"
return vim_item
end
We also need to add the type field to our completion items:
items = {
  { label = "/one", type = "Post" },
}
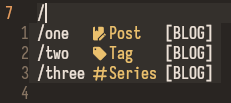
With this we can display our custom types in the same way as lspkind.nvim does it:
What to complete where?
With source:complete we already have the tools we need to autocomplete whatever we want.
The completion part of the integration is the section I’ve had to tweak the most and it has slowly grown more complex.
It’s actually pretty hard to make an exhaustive autocomplete system.
You’d have to have a parser that’s capable of parsing incomplete statements.
Maybe something like a Tree-sitter grammar, although the one I created for Djot doesn’t mark broken things so it’s useless for this purpose (it marks a paragraph with a single _ as text instead of broken emphasis for example).
I’ve therefore been relying on regexes on cursor_before_line to select what to complete.
You could probably design a more powerful solution but this simple approach has served me well so far.
Completion logic
Here’s one of first versions of source:complete to give you an idea on how you might choose what to complete:
local items = {}
-- Expand images separately because I only ever use it in a -- ``
-- context and not mixing with other urls gives a more pleasant experience.
if string.match(cursor_before_line, "!%[%]%([^%)]*$") then
-- items = ...
end
-- Expand inline links, e.g. `[txt](/`
if string.match(cursor_before_line, "%]%(/[^%)]*$") then
-- items = ...
end
-- Expanding headings in inline links, e.g. `[txt](#`
if string.match(cursor_before_line, "%]%(#[^%)]*$") then
-- items = ...
end
-- Expand links in link ref definitions, e.g. `[label]: `
if string.match(cursor_before_line, "^%[.+%]:%s+") then
-- items = ...
end
-- Expanding links in ref defs, e.g. `[label]: #`
if string.match(cursor_before_line, "^%[.+%]:%s+#") then
-- items = ...
end
-- Expand url definition tags in `[text][tag]`
if string.match(cursor_before_line, "%[[^%]]+%]%[[^%]]*$") then
-- items = ...
end
-- Expand url definition tags in `[tag][]`, simplified to after a `[`
-- If at the beginning of the line, we should complete broken link tags to..
if string.match(cursor_before_line, "%[[^%]]*$") then
-- items = ...
end
-- More cases here...
callback(items)
Anatomy of a regex
Don’t be too scared of the regexes. They’re hard to read if you’re unfamiliar, but not too bad once you use them a bit.
For example, here’s how the regex matches an image url with the text  )
]* 0 or more times
$ end of string
It’s important to include the end of string, so that we don’t autocomplete images after the image has ended:
 Trailing path /
^
Don't autocomplete image here
The [^%)]* part allows the completion to match further into the path:

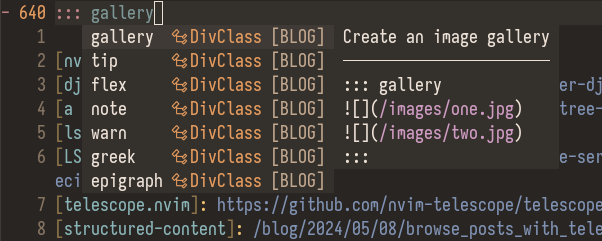
Another feature is the “documentation window” which is an extra window with information about the entry you’re currently selecting.
To set it up all we need to do is implement source:resolve and set item.documentation, for example like this:
-- We should generate `lines` depending on the item.
local lines = {
"`Rewriting my Neovim config in Lua`",
"2023-10-01",
"*Neovim*, *Lua*",
"---",
-- Post content here
}
if lines and #lines > 0 then
item.documentation = {
kind = "markdown",
value = vim.fn.join(lines, "\n") .. "\n",
}
end
callback(item)
end
We could’ve set item.description immediately but source:resolve is preferable as it’s only called when we select the item, making it the better choice if we want to do some heavier operations (such as reading from a file).
Speaking of reading from a file, here’s a function that lets you read a range of lines from a file:
-- Collect the lines into `res` instead of returning it,
-- to make it easier to insert lines before the file content.
local
local linenum = 1
for line in io.lines(file) do
if linenum >= start_row and linenum <= end_row then
table.insert(res, line)
end
linenum = linenum + 1
if linenum > end_row then
break
end
end
end
It’s used like this to produce a documentation for a heading item from another file (preferring nvim_buf_get_lines for headings in the current buffer):
local
-- If there's a heading path, then the item is pointing to a heading in another file.
if heading.context.path then
-- Uses markdown to make the url bold and adds a separator before the heading context.
local res = {
"*" .. heading.context.url .. "*",
"---",
}
-- Read the heading and the 10 following lines.
read_lines(heading.context.path, heading.context.start_row, heading.context.end_row + 10, res)
return res
else
-- If we don't have a heading then heading points to the same file.
-- We can use the buffer `0` to read lines from the current buffer.
return vim.api.nvim_buf_get_lines(
0,
heading.context.start_row,
heading.context.end_row + 10,
false
)
end
end
To display post bodies we also need to skip the frontmatter.
The frontmatter for my posts are delimited by --- like so:
---toml
title = "My post title"
tags = ["Lua", "Neovim"]
---

Post body here...
We can do this by counting how many --- we see, and only collecting lines after we’ve seen two of them:
-- Collect `limit` lines from `file` into `res`, skipping the post frontmatter.
local
local count = 1
local frontmatter_delimiters = 0
for line in io.lines(file) do
if frontmatter_delimiters == 2 then
table.insert(res, line)
count = count + 1
if count > limit then
break
end
elseif string.match(line, "^%-%-%-") then
frontmatter_delimiters = frontmatter_delimiters + 1
end
end
end
local
-- I add more things such as tags and series
-- but I shortened the code for this example.
local res = {
"`" .. post.title .. "`",
"---"
}
read_post_body(post.path, 20, res)
return res
end
Sorting
With nvim-cmp you get full control over the sorting of items.
Sorting is done with standard comparison functions (e.g. entry1.modified > entry2.modified) that you can chain.
We can add our own comparator to cmp.setup like so:
cmp.setup({
sorting = {
comparators = {
-- With cmp you chain comparators.
cmp.config.compare.offset,
cmp.config.compare.exact,
cmp.config.compare.score,
cmp.config.compare.recently_used,
cmp.config.compare.locality,
-- I added my comparator here.
blog_compare,
cmp.config.compare.kind,
cmp.config.compare.sort_text,
cmp.config.compare.length,
cmp.config.compare.order,
},
},
})
local
-- TODO
return nil
end
The first thing I’d like to do is sort different completion types, similar to cmp.config.compare.kind but for the custom blog types:
local blog_types = {
BrokenLink = { rank = 0, symbol = "" },
LinkDef = { rank = 1, symbol = "" },
-- etc
}
local
-- Only sort blog entries.
if entry1.source.name ~= "blog" or entry2.source.name ~= "blog" then
return nil
end
local item1 = entry1.completion_item
local item2 = entry2.completion_item
local rank1 = blog_types[item1.type].rank
local rank2 = blog_types[item2.type].rank
if rank1 < rank2 then
return true
elseif rank1 > rank2 then
return false
end
-- The types are the same, `nil` doesn't imply a sort order between them.
return nil
end
At the end of blog_compare we can add our type specific comparisons.
For example, we can sort images by the modified timestamp so that the newest image comes first, making it easy to insert new images:
if item1.type == "Img" then
  -- Sort images by modification time.
  return item1.modified > item2.modified
elseif ... then
  -- More type specific sorting cases here
else
  return nil
end
Wrap-up
With this we’ve created our own completion source for nvim-cmp. We’ve tweaked the display, separated the insert and filter text, added item documentation, and customized the sorting. The completion has been extremely helpful for me and I’ll end this post with a gallery of the completion in action:


Check out my Neovim config and the site source for more details.